What is CorelDraw?
- CorelDraw is a computer software used for making drawings and designs.
- It creates vector graphics, which are made of shapes and lines, not pixels.
- Vector graphics can be resized bigger or smaller without losing quality.
- CorelDraw is used to make logos, posters, labels, and other designs.
- It has tools to add and edit text fonts and styles.
- It also allows basic photo editing like changing colors and brightness.
- Designers and artists use CorelDraw to create clean and professional artwork.
- Example: If you draw a star and make it bigger, it will stay sharp and clear.
Hindi:
- CorelDraw एक कंप्यूटर सॉफ्टवेयर है जो चित्र और डिजाइन बनाने के लिए उपयोग होता है।
- यह वेक्टर ग्राफिक्स बनाता है, जो आकृतियों और रेखाओं से बने होते हैं, पिक्सल से नहीं।
- वेक्टर ग्राफिक्स को बड़ा या छोटा करने पर भी क्वालिटी खराब नहीं होती।
- CorelDraw का इस्तेमाल लोगो, पोस्टर, लेबल और अन्य डिजाइन बनाने के लिए किया जाता है।
- इसमें टेक्स्ट के फॉन्ट और स्टाइल जोड़ने और बदलने के टूल होते हैं।
- यह कुछ बेसिक फोटो एडिटिंग जैसे रंग और चमक बदलने की सुविधा भी देता है।
- डिजाइनर और कलाकार इसे साफ और प्रोफेशनल आर्टवर्क बनाने के लिए उपयोग करते हैं।
- उदाहरण: अगर आप एक तारा बनाते हैं और उसे बड़ा करते हैं, तो वह साफ और स्पष्ट रहेगा।
I will prepare notes step by step on each topic in the same clear and easy format (English first, then Hindi) as before. Let’s start with the first topic now:
1. What is Bitmap Image?
English:
- A bitmap image is made up of tiny dots called pixels.
- Each pixel has its own color.
- When you zoom in or make a bitmap image bigger, it can look blurry or blocky because the pixels become visible.
- Bitmap images are used for photos and detailed pictures.
- Common bitmap file types are JPEG, PNG, and BMP.
Hindi:
- बिटमैप इमेज बहुत छोटे रंगीन डॉट्स (पिक्सल) से बनती है।
- हर पिक्सल का अपना रंग होता है।
- जब आप बिटमैप इमेज को बड़ा करते हैं या ज़ूम करते हैं, तो यह धुंधला या ब्लॉकी दिख सकता है क्योंकि पिक्सल्स दिखने लगते हैं।
- बिटमैप इमेज का उपयोग तस्वीरों और डिटेल्ड चित्रों के लिए होता है।
- सामान्य बिटमैप फाइल फॉर्मेट्स हैं JPEG, PNG, और BMP।
Let’s continue step by step for each topic.
2. Difference between Bitmap and Vector (Table Format)
English:
| Bitmap Image | Vector Image |
|---|---|
| Made of small dots called pixels | Made of shapes, lines, curves (mathematics) |
| Quality reduces when resized | Quality stays same when resized |
| Used for photos and detailed images | Used for logos, icons, simple illustrations |
| File size can be large | File size is usually smaller |
| Examples: JPEG, PNG, BMP | Examples: SVG, EPS, CDR |
| Difficult to edit parts separately | Easy to edit each part separately |
Hindi:
| बिटमैप इमेज | वेक्टर इमेज |
|---|---|
| छोटे-छोटे पिक्सल (डॉट्स) से बनी होती है | आकार, रेखाओं और कर्व (गणितीय) से बनी होती है |
| आकार बदलने पर क्वालिटी घटती है | आकार बदलने पर क्वालिटी वैसी ही रहती है |
| फोटो या डिटेल्ड चित्रों में उपयोग होती है | लोगो, आइकन, सिंपल चित्रों के लिए उपयोग |
| फाइल साइज बड़ा हो सकता है | फाइल साइज छोटा रहता है |
| उदाहरण: JPEG, PNG, BMP | उदाहरण: SVG, EPS, CDR |
| अलग-अलग पार्ट एडिट करना मुश्किल | हर पार्ट अलग से एडिट कर सकते हैं |
3. Difference between Pixel and PPI (Table Format)
English:
| Pixel | PPI (Pixels Per Inch) |
|---|---|
| Smallest dot in an image | Number of pixels in one inch of display/image |
| Makes up all digital pictures | Shows how clear or sharp an image is |
| Measured as count (example: 1920×1080) | Measured as density (example: 72 PPI, 300 PPI) |
| Does not directly affect print quality | Higher PPI means better print/display clarity |
Hindi:
| पिक्सल | PPI (पिक्सल्स पर इंच) |
|---|---|
| तस्वीर का सबसे छोटा हिस्सा | एक इंच में कितने पिक्सल हैं |
| हर डिजिटल इमेज पिक्सल्स से बनी होती है | इमेज या स्क्रीन की स्पष्टता दिखाता है |
| गिनती में मापा जाता है (जैसे: 1920×1080) | घनत्व में मापा जाता है (जैसे: 72 PPI, 300 PPI) |
| सीधे प्रिंट क्वालिटी पर असर नहीं पड़ता | ज्यादा PPI मतलब ज्यादा स्पष्टता |
4. Components of CorelDraw (Title Bar, Property Bar, etc.)
English:
- Title Bar: Shows the name of the current file at the top.
- Menu Bar: Contains menus like File, Edit, View, etc.
- Property Bar: Shows options for the selected tool or object.
- Toolbox: Has different drawing and editing tools.
- Docker/Panel: Side areas with extra options, like color and layers.
- Rulers: Lines on top and side to measure and align objects.
- Drawing Page: The main area where you create designs.
- Status Bar: Located at the bottom, it shows information about your file or selected object.
- Scroll Bars: Help you move up-down or left-right on your page.
- Color Palette: A set of colors to use for filling or outlining shapes.
Hindi:
- टाइटल बार: सबसे ऊपर, इसमें फाइल का नाम दिखाई देता है।
- मेनू बार: इसमें File, Edit, View जैसे मेनू होते हैं।
- प्रॉपर्टी बार: चुने हुए टूल या ऑब्जेक्ट के आप्शन दिखाता है।
- टूलबॉक्स: चित्र बनाने और एडिट करने के लिए टूल्स होते हैं।
- डॉकर/पैनल: साइड में अलग-अलग सेटिंग्स, जैसे रंग और लेयर।
- रूलर: ऊपर और साइड में लाइन, जिससे माप और अलाइन करना आसान होता है।
- ड्राइंग पेज: मुख्य जगह जहाँ डिजाइन बनाते हैं।
- स्टेटस बार: सबसे नीचे, फाइल या चुने गए ऑब्जेक्ट की जानकारी देता है।
- स्क्रॉल बार: पेज को ऊपर-नीचे और दाएं-बाएं करने में सहायता करता है।
- कलर पैलेट: रंगों का सेट, जिससे आकार में रंग भर सकते हैं या किनारा दे सकते हैं।
5. What are Tools in CorelDraw?
English:
- Tools in CorelDraw help you to draw, edit, move, and change objects on the drawing page.
- Some main tools are:
- Pick Tool: Selects and moves objects.
- Shape Tool: Changes the shape of objects.
- Crop Tool: Cuts unwanted parts of an image or object.
- Zoom Tool: Zooms in or out to see details or the whole drawing.
- Text Tool: Adds and edits text.
- Freehand Tool: Draws freehand lines or shapes.
- Rectangle Tool: Draws rectangles and squares.
- Ellipse Tool: Draws circles and ovals.
- These tools are found in the Toolbox on the left side.
Hindi:
- CorelDraw में टूल्स मदद करते हैं चित्र बनाने, एडिट करने, मूव करने व आकार बदलने में।
- कुछ मुख्य टूल्स हैं:
- पिक टूल: ऑब्जेक्ट को सिलेक्ट और मूव करता है।
- शेप टूल: ऑब्जेक्ट का आकार बदलता है।
- क्रॉप टूल: इमेज या ऑब्जेक्ट का अनचाहा हिस्सा काटता है।
- ज़ूम टूल: डिटेल देखने के लिए ज़ूम इन या पूरा पेज देखने को ज़ूम आउट करता है।
- टेक्स्ट टूल: टेक्स्ट जोड़ने और एडिट करने के लिए।
- फ्रीहैंड टूल: मनचाही रेखाएँ या आकार बनाता है।
- रेक्टेंगल टूल: चौकोर या आयत बनाता है।
- इलिप्स टूल: गोल या अंडाकार बनाता है।
- ये टूल्स आमतौर पर बाईं तरफ टूलबॉक्स में मिलते हैं।
6. Explain Crop Tool, Pick Tool, Zoom Tool, Text Tool
English:
- Crop Tool:
Used to cut or remove unwanted parts from an image or drawing. It helps to focus only on the important part. - Pick Tool:
Used to select, move, resize, and rotate objects. It is the main tool for handling objects on the page. - Zoom Tool:
Used to zoom in to see small details or zoom out to see the whole drawing. It helps you work more accurately. - Text Tool:
Used to add text to your design. You can change the font, size, color, and style of the text.
Hindi:
- क्रॉप टूल:
इमेज या ड्राइंग के अनचाहे हिस्से काटने के लिए। इससे आप केवल जरूरी हिस्सा दिखा सकते हैं। - पिक टूल:
ऑब्जेक्ट चुनने, घुमाने, मूव करने, और साइज बदलने के लिए। यह सबसे ज़रूरी टूल है। - ज़ूम टूल:
छोटे-छोटे डिटेल्स देखने के लिए ज़ूम इन करता है और पूरा डिज़ाइन देखने के लिए ज़ूम आउट। - टेक्स्ट टूल:
अपने डिजाइन में टेक्स्ट जोड़ने के लिए। आप टेक्स्ट का फॉन्ट, साइज, रंग और स्टाइल बदल सकते हैं।
7. How can you Import and Export File in CorelDraw? (Stepwise)
English:
Importing a File:
- Open CorelDraw and go to the File menu.
- Click on Import.
- Browse your computer and select the file you want to add.
- Click Import or Open to bring the file into your CorelDraw workspace.
- Place the imported file where you want on the drawing page.
- Now you can edit or use it in your design.
Exporting a File:
- After finishing your design, go to the File menu.
- Click on Export.
- Choose the location on your computer where you want to save.
- Select the file format you want (like JPEG, PNG, PDF).
- Click Export or Save.
- Adjust settings if asked (like resolution), then confirm.
Hindi:
फाइल इम्पोर्ट करना:
- CorelDraw खोलें और File मेनू पर जाएं।
- Import विकल्प पर क्लिक करें।
- अपने कंप्यूटर में उस फाइल को खोजें जिसे आप लाना चाहते हैं।
- Import या Open पर क्लिक करें।
- ड्राइंग पेज पर फाइल को जहां रखना है वहां रखें।
- अब आप इसे एडिट या अपने डिजाइन में यूज़ कर सकते हैं।
फाइल एक्सपोर्ट करना:
- डिजाइन पूरा करने के बाद, File मेनू पर जाएं।
- Export विकल्प पर क्लिक करें।
- अपने कंप्यूटर में वो जगह चुनें जहां फाइल सेव करनी है।
- फाइल फॉर्मेट चुनें (जैसे JPEG, PNG, PDF)।
- Export या Save पर क्लिक करें।
- अगर सेटिंग्स पूछे जाएं (जैसे रिज़ॉल्यूशन), तो ठीक करें और कन्फर्म करें।
8. What is Logo?
English:
- A logo is a simple picture or symbol that represents a company, brand, or product.
- It helps people easily recognize the company or brand.
- Logos are often made with shapes, colors, and sometimes text.
- A good logo is clear, simple, and easy to remember.
- Companies use logos on products, advertisements, and websites.
Hindi:
- लोगो एक साधारण चित्र या चिन्ह होता है जो किसी कंपनी, ब्रांड या उत्पाद का प्रतिनिधित्व करता है।
- इसका उपयोग लोगों को कंपनी या ब्रांड पहचानने में आसानी के लिए होता है।
- लोगो आमतौर पर आकृतियाँ, रंग, और कभी-कभी टेक्स्ट से बनता है।
- एक अच्छा लोगो साफ, सरल और याद रखने में आसान होता है।
- कंपनियां अपने उत्पादों, विज्ञापनों और वेबसाइट पर लोगो का उपयोग करती हैं।
9. How can you Save Drawing in CorelDraw?
English:
- After completing your design, go to the File menu.
- Click on Save or Save As.
- If you choose Save As, select the location on your computer where you want to save the file.
- Enter a name for your file.
- Make sure the file type is set to CDR (CorelDraw’s default file format).
- Click Save.
- Your drawing will be saved and you can open it later to edit or print.
Hindi:
- डिजाइन पूरा करने के बाद, File मेनू पर जाएं।
- Save या Save As पर क्लिक करें।
- अगर आपने Save As चुना है, तो अपने कंप्यूटर में वह जगह चुनें जहां आप फाइल सेव करना चाहते हैं।
- फाइल का नाम डालें।
- फाइल टाइप को CDR (CorelDraw का डिफ़ॉल्ट फॉर्मेट) पर रखें।
- Save पर क्लिक करें।
- आपकी ड्राइंग सेव हो जाएगी और आप बाद में इसे खोलकर एडिट या प्रिंट कर सकते हैं।
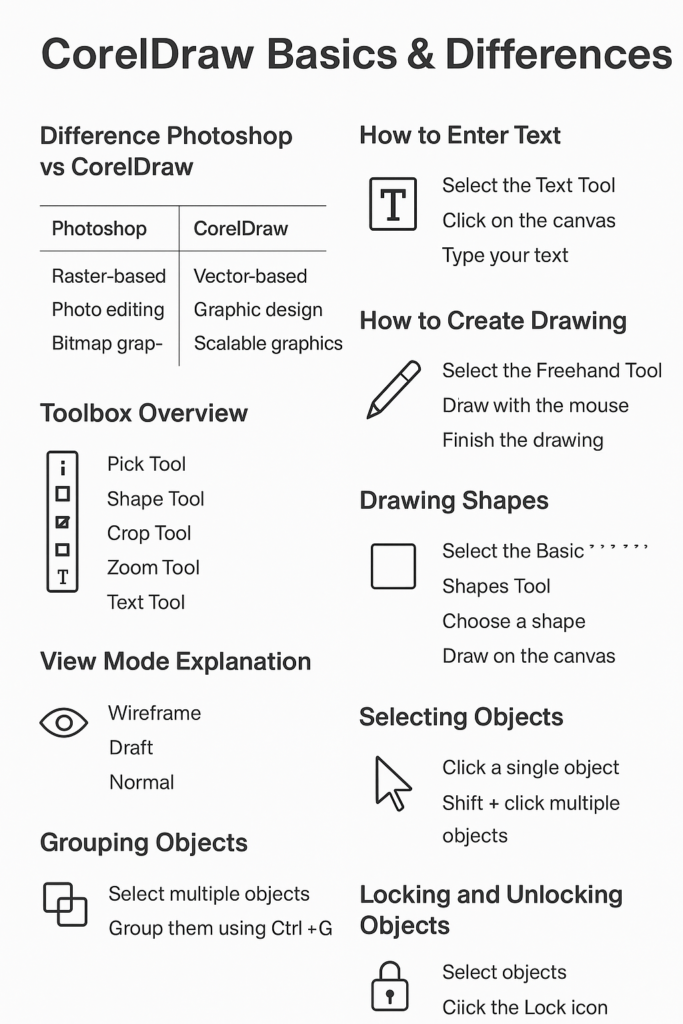
10. Difference between Photoshop and CorelDraw (Table Format)
| Photoshop | CorelDraw |
|---|---|
| Works mainly with bitmap (raster) images made of pixels | Works mainly with vector graphics made of lines and shapes |
| Best for photo editing and detailed image manipulation | Best for designing logos, illustrations, and scalable graphics |
| Images lose quality when resized | Images retain quality when resized |
| Uses layers to manage image parts | Uses objects and shapes to manage design parts |
| Complex color editing and filters available | Focuses on clean, scalable graphic creation |
| File formats include JPEG, PNG, PSD, TIFF | File formats include CDR, SVG, EPS |
| More suitable for digital painting and photo retouching | More suitable for print design and logos |
| Can work with 3D and animation features | Limited to 2D graphic design |
11. How can you Enter Text in CorelDraw?
English:
- Select the Text Tool from the toolbox.
- Click anywhere on the drawing page where you want to type.
- Start typing your text.
- You can change the font, size, color, and style from the property bar above.
- To edit existing text, click on the text with the Text Tool and make changes.
Hindi:
- टूल बॉक्स से टेक्स्ट टूल चुनें।
- ड्राइंग पेज पर उस जगह क्लिक करें जहाँ आपको टेक्स्ट डालना है।
- अपना टेक्स्ट टाइप करना शुरू करें।
- आप प्रॉपर्टी बार से फॉन्ट, साइज, रंग और स्टाइल बदल सकते हैं।
- टेक्स्ट को एडिट करने के लिए, टेक्स्ट टूल से उस टेक्स्ट पर क्लिक करें और बदलाव करें।
12. How can you Create a Drawing in CorelDraw? (Steps)
English:
- Open CorelDraw and create a new document.
- Use tools from the toolbox to draw shapes or lines.
- Use the Pick Tool to move or resize objects.
- Add colors using the color palette.
- Use the Text Tool to add text if needed.
- Edit shapes and text as desired with various tools.
- Save your drawing after completion.
Hindi:
- CorelDraw खोलें और नया डॉक्यूमेंट बनाएं।
- टूलबॉक्स से टूल्स लेकर आकृतियाँ या रेखाएँ बनाएं।
- ऑब्जेक्ट को मूव या रीसाइज करने के लिए पिक टूल का उपयोग करें।
- रंग भरने के लिए कलर पैलेट का उपयोग करें।
- जरूरत हो तो टेक्स्ट टूल से टेक्स्ट जोड़ें।
- जितनी जरूरत हो शेप और टेक्स्ट एडिट करें।
- पूरा होने पर अपनी ड्राइंग सेव करें।
13. Tool Box in corel draw
English:
- The Toolbox is a vertical panel that contains all the essential tools for drawing, shaping, painting, and editing.
- It includes tools like Pick Tool, Shape Tool, Crop Tool, Zoom Tool, Text Tool, Rectangle Tool, Ellipse Tool, and more.
- It is usually located on the left side of the CorelDraw window.
Hindi:
- टूलबॉक्स एक लंबवत पैनल होता है जिसमें ड्रॉइंग, शेपिंग, पेंटिंग और एडिटिंग के लिए जरूरी सभी टूल्स होते हैं।
- इसमें पिक टूल, शेप टूल, क्रॉप टूल, ज़ूम टूल, टेक्स्ट टूल, रेक्टेंगल टूल, इलिप्स टूल आदि शामिल होते हैं।
- यह आमतौर पर CorelDraw विंडो के बाईं तरफ होता है।
14. What Do You Mean by View Mode?
English:
- View Mode is the way your drawing or design is displayed on the screen.
- Common view modes in CorelDraw include Wireframe, Enhanced, and Normal.
- Wireframe shows only outlines without colors for easy editing.
- Enhanced shows the full colors and effects.
- Different view modes help in working on details or overall design.
Hindi:
- व्यू मोड का मतलब है कि आपकी ड्राइंग या डिजाइन स्क्रीन पर कैसे दिखती है।
- CorelDraw में आम व्यू मोड होते हैं वायरफ्रेम, एन्हांस्ड, और नॉर्मल।
- वायरफ्रेम में केवल आउटलाइन दिखती है, कोई रंग नहीं, जिससे एडिटिंग आसान होती है।
- एन्हांस्ड में पूरा रंग और इफेक्ट्स दिखते हैं।
- अलग-अलग व्यू मोड से आप डिटेल या पूरा डिजाइन बेहतर देख सकते हैं।
15. How Can You Draw Shapes in CorelDraw?
English:
- Open the Toolbox on the left side.
- Select the shape tool you want like Rectangle Tool or Ellipse Tool.
- Click and drag on the drawing page to create the shape.
- Release the mouse button when the shape is the right size.
- You can move, resize, or fill the shape with color as needed.
Hindi:
- बाईं ओर टूलबॉक्स खोलें।
- जिस शेप टूल जैसे रेक्टेंगल टूल या इलिप्स टूल को चुनें।
- ड्राइंग पेज पर क्लिक करें और ड्रैग करें ताकि शेप बने।
- जब आकार सही हो, तो माउस बटन छोड़ दें।
- आप शेप को मूव, रीसाइज या रंग भर सकते हैं।
16. How Can You Select Object in CorelDraw?
English:
- Use the Pick Tool from the Toolbox.
- Click once on the object you want to select.
- To select multiple objects, hold the Shift key and click on each object.
- You can also click and drag to create a selection box around multiple objects.
Hindi:
- टूलबॉक्स से पिक टूल का उपयोग करें।
- उस ऑब्जेक्ट पर एक बार क्लिक करें जिसे आप चुनना चाहते हैं।
- एक से ज्यादा ऑब्जेक्ट चुनने के लिए Shift दबाकर हर ऑब्जेक्ट पर क्लिक करें।
- आप ड्रैग कर के भी कई ऑब्जेक्ट्स को एक साथ चुन सकते हैं।
17. How Can You Group Objects in CorelDraw?
English:
- Select the objects you want to group using the Pick Tool.
- Right-click on the selected objects.
- Choose Group from the menu, or press Ctrl + G.
- The objects will act as one group now for easier moving or editing.
Hindi:
- पिक टूल से उन ऑब्जेक्ट्स को चुनें जिन्हें आप ग्रूप करना चाहते हैं।
- चुने हुए ऑब्जेक्ट्स पर राइट-क्लिक करें।
- मेनू से Group चुनें या Ctrl + G दबाएं।
- अब वे ऑब्जेक्ट्स एक ग्रूप की तरह काम करेंगे, जिससे मूव और एडिट आसान होगा।
18. How Can You Lock and Unlock Object in CorelDraw?
English:
- To lock an object: Select it, right-click, and choose Lock Object.
- Locked objects cannot be moved or edited until unlocked.
- To unlock an object: Go to the Object Manager or right-click on the locked object and select Unlock Object.
Hindi:
- ऑब्जेक्ट को लॉक करने के लिए: उसे चुनें, राइट-क्लिक करें, और Lock Object चुनें।
- लॉक किए हुए ऑब्जेक्ट को तब तक मूव या एडिट नहीं किया जा सकता जब तक उसे अनलॉक न किया जाए।
- ऑब्जेक्ट को अनलॉक करने के लिए: Object Manager में जाएं या लॉक किए हुए ऑब्जेक्ट पर राइट-क्लिक करके Unlock Object चुनें।